How to Arrange Your Music Room

Nowadays, many people are busting the myth that playing musical instruments is nearly impossible and are taking the power of music into their hands to do something productive in their free time or make a living out of it. It doesn’t matter if it’s just a pastime activity for you or a source of earning; you should have a proper and separate space to let out the musician in you.
Without a music room, you cannot be fully comfortable playing your best because you would spend all the time worrying if it’s too loud for the outsiders. And honestly, it may disturb a lot of people in your house or your neighborhood, but it will also distract you by the noises of traffic, people, electric appliances, etc.
So, it is always better to have a music room where you can play without worrying about the noises infiltrating either side of the room.
Every single person has their own needs and ways in which they want to develop their music room which is why you must have a major hand in designing your music space.
Arranging the music room can be overwhelming and might confuse you, but remember that you don’t have to do everything alone. You can always ask for help from professionals who will guide you in the right direction and enable you to make the right choices.
We are aware of all the problems you might face and questions you might have while arranging or organizing the music room, which is why we have gathered some amazing and useful tips to arrange your music room.
1. Finding the Right Place
Before you arrange your music room, the first thing to do is to find the right place. Finding a good location for a music room depends on many factors, including the space available in your house. Most people do not have a lot of extra space and rooms in their houses, limiting their options to choose a place to convert into a music room.
Before selecting a room, you should make sure not to consider the busy areas of your house like the living room or any other areas that are frequently used by others. If you have a group practicing at your place, then you might need a lot more than just a music corner in your bedroom.
If you have a spare room at your place or a basement, you can use it creatively as the music room. Having enough space can also allow you to develop a home studio or recording room where you can practice with the whole group or band.
2. Soundproofing the Room
Soundproofing the room means keeping the external sounds out of the room and internal sounds within it. By keeping the outside and inside sounds on their respective sides, you can stop both your music sessions and your family and neighbors from getting disturbed.
You probably won’t realize the importance of a soundproof music room until you start practicing your instruments or recording songs. When the sounds of traffic, people, plumbing, footsteps, television, or weather stand in the way of your recording or practice sessions, it feels like a necessity to soundproof your room.
Soundproofing should generally be the first thing you do while arranging the music room. There are several processes that you can use to soundproof your music room. The first thing you should do is add mass or density to your walls.
If the room walls carry a lot of mass, it can prohibit the walls from vibrating as a result of the sound energy. But it can be hard to add mass to existing walls, which is why extra arrangements are made with the help of specific materials, such as mass-loaded vinyl that helps in soundproofing it.
Another method you can use is damping, which converts sound energy into heat energy, creating a sound barrier that’s effective and simple. Presently, Green Glue is the most powerful damping compound available, which can be applied between two hard panels, e.g., plywood, attaching them to each other.
You can give a final touch by sealing all the air gaps and holes in the room because no matter how many soundproofing methods you apply, if there is even a single open crack or air space in the room, it can make every effort of yours useless.
3. Applying the Sound Absorption Techniques

Many musicians consider sound absorption techniques as one of the essentials for their music rooms as they provide clarity in sounds and improve the acoustics of the room. Sounds mostly create echoes through hard surfaces, which can be minimized by using usual furnishings such as rugs, mats, pads, etc., in the room.
Wool fibers are better known for sound absorption when compared to synthetic yarns. Plants are also excellent sound absorbers and can be used for decoration purposes as well. Other materials widely used for their sound-absorbing properties include acoustic plaster, wood particle board, mineral/glass wool mats, and many more.
Sound absorption can also be a problem if achieved more than the requirement because it can make the sounds faint and inaudible. Another thing to remember while using all these techniques is that the corners are also an important part of your room that can generate reflective sounds.
There are several ways through which you can make the corners less problematic. You can avoid this problem by placing a bookshelf in one corner and a fabric room divider or a floor plant in another. Adding a wallpaper or wall panel on one or two walls also helps. You can also use other decorative items such as a lamp with fabric shades, chairs, and sofas with padding, etc.
4. Light Up Your Room

Practicing in a dull and dark room with insufficient lights can kill the mood of your music sessions. Adding mood lights to the walls, ceilings, and floors can bring positive energy to your place. Proper lighting in your music room can be used for two main reasons.
Firstly, you are going to need adequate light to see and read the music sheets or books. You will be needing functional lights for this purpose. Functional lights do not necessarily have to be boring as there are so many designs and choices available for you to make them interesting and aesthetic.
The second reason why you need the lighting is to maintain the ambiance of the room. The room’s lighting can have a prominent influence on your performances, so you should ensure that the lighting suits you and others who practice or perform with you.
First, let’s begin with the essential lighting for your room, including main overhead lights, flexible floor lamps, task lighting, and more. These lights would not only help you read the sheets but also provide a decent look to your music room.
In the case of overhead lights in the room, it’s smart to use LED lights as they will help you save some money on your electricity bills while still delivering a bright light.
Many musicians use staging lights in their rooms that help them perform better while rehearsing for their final performances. Spotlights and projectors are often used as stage or studio lights. If you don't have a projector, you should buy one. According to Thegadgetbeasts, projectors can be bought as cheap as $400!
5. Arrange Your Furniture and Music Setup
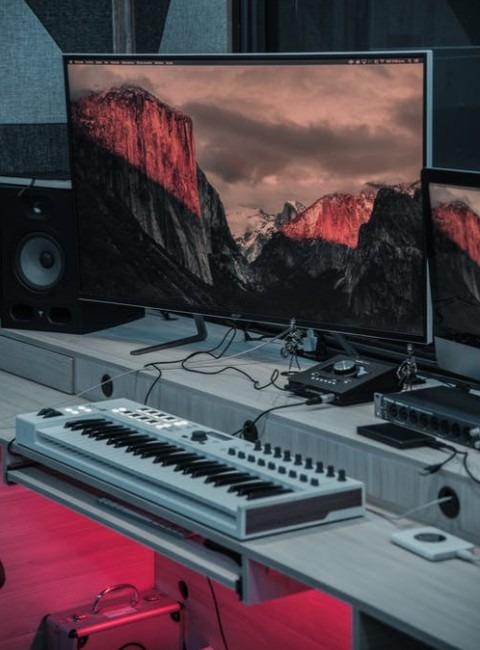
After arranging the right lighting for your room, the next step is to find the right furniture and set up your music equipment and devices in the right place. When selecting the furniture, make sure it is comfortable and has the right size according to the room.
You will be needing a chair or sofa that makes you feel comfortable because you might spend plenty of hours there. If you have a group or band, make sure there is something for everyone so that they don’t feel uneasy rehearsing at your place.
Another important part of the furniture you will need is a desk or table with enough space to fit your computer, other equipment, and more useful items. You might also need various shelves to accommodate your music sheets, books, musical instruments, documents, and other essential or decorative items. Also, make sure to store your musical instruments safely and carefully in their respective places. Its also to important to have the right paint colors for your room.
6. Decoration Ideas

Music room décor can be a fun experience, and even though you are stressed about it, there are so many amazing options out there to choose from. Your ideas do not have to be enormous or expensive; you can always start with simple.
Many musicians use a basic display idea that is to put up the musical instrument as wall décor. This way, you can store your instruments safely and make your music room look more attractive and smart.
Another way to put a touch of elegance in your music room is to add rugs and mats. These rugs are multipurpose as they can work as sound-absorbing items while making your room look nicer. Talking about sound absorption, plants can also play an important role in your music room. They not only fulfill their sound-absorbing purpose but also offer a simple and refreshing look to your music space.
Many people who transform their extra bedroom into a music room can utilize the closets by storing their musical instruments and other essentials in them. Automatically, this creates space for other things that you can place in the room.
You can make your music room much more fun by adding vibrant colors to the walls and displaying your favorite records on the walls or shelves, etc.
Conclusion
Arranging the music room in your house can be a not-so-easy task and may require a lot of effort to make it favorable. In this article, we put together some reasons why you need a private music room in your house to practice your musical instruments in peace. We hope you like these steps to design the perfect music room for yourself and enjoy your practice or recording sessions.